I Tried Peel-and-Stick Wallpaper—and Learned the Limits of My DIY Skills
It’s been painted as one of the easier home design refreshes you can make. My takeaway? Call a professional.

It’s been painted as one of the easier home design refreshes you can make. My takeaway? Call a professional.
When I first moved into my apartment in late 2022, I had big design dreams. Faced with the lack of space that most city apartments offer, I made plans to optimize my storage, actually buy a headboard, and do something about my sad, windowless bathroom. Fast forward a year and change later, and I had checked off… exactly zero things from the list. Refusing to ring in yet another year in an unfinished apartment, I decided it was finally time to make my house a home. Since buying a headboard could be expensive (and I’m notoriously indecisive) and organizing all of my belongings would probably take me several months, I decided to start with an easier project—the bathroom.
A quick scroll through DIY Instagram and TikTok reveals removable wallpaper as the main character of the mini home renovation. Amateur designers aren’t just lining their walls with the stuff, they’re also using it to breathe new life into doors, kitchen counters, and even a bookshelf or two. With its adhesive backing, the wallpaper can be easily installed and (fingers crossed) removed without damaging the walls underneath, making it an attractive option for renters like me. So, instead of taking a paintbrush to my walls, I decided to hit up Google and YouTube University to find out if I, a self-declared non-DIYer, could pull off installing the wallpaper myself.
Getting started
Before I started, I needed to be real about the limitations of my space. Since the walls in my bathroom are half-wall, half-brown tile, I needed a pattern that would complement and not clash with the tile. I also learned that smooth walls are the best candidate for removable wallpaper, while textured walls (think: popcorn ceilings) won’t work well since the wallpaper won’t be able to lie flat across it.
Next, I researched wallpaper brands with good reviews and a wide range of patterns and color options. Instead of ordering rolls of wallpaper sight unseen, I found that most brands offer small square-shaped samples so that you can get a feel for the color and prints in person. I decided to reach out to popular wallpaper brands Otto Studio and Chasing Paper, who provided me with a range of samples to test courtesy of the company. I was particularly curious to compare the patterned samples to the solids and see how each could revamp my space. After receiving each sample, I stuck them up on my bathroom walls, and lived with them to see which sample I liked best.

One of these swatches was the winner!
Courtesy Maliah West
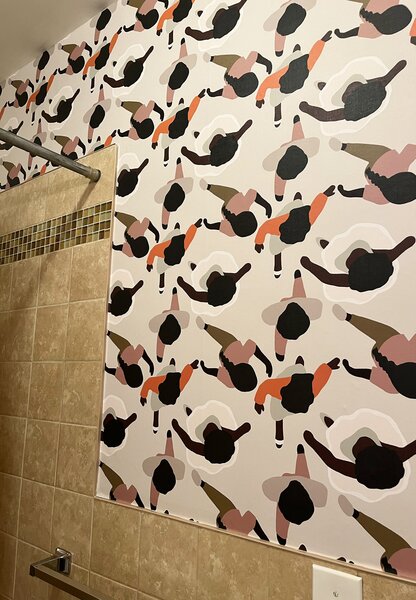
After a few weeks, I decided on the Busy Street print in Ecru from Otto Studio, mainly because I wanted something visually interesting but not overwhelming. I used the brand’s measuring guide to decide how much wallpaper I should order. This was arguably the most important step as there are likely few things worse than running out of wallpaper mid-project and having to wait for more to come. Each wallpaper brand has its own measuring equation. Thankfully, in addition to a measuring guide, Otto Studio has a visual aide in the form of a TikTok, which as a visual learner I found helpful.
While measuring, the guide recommended keeping pattern overlap (depending on installation, each pattern may not completely repeat in every panel but in every other panel, so you’ll want to account for this) in mind and ordering an extra panel or two in the case of any mistakes or mismeasurement. Since I only needed to worry about covering half of my walls, I felt pretty confident with my measuring job and calculated that I would need about nine panels of the brand’s 24"x 60" wallpaper.
Prep work
While my bathroom’s walls are pretty smooth, there were a few textured spots that I opted to sand down with sandpaper. The day before installation, I also cleaned my grimy walls with a mixture of degreaser and dishwashing liquid.
In addition to ensuring your walls are fully dry before getting started, you also shouldn’t paint anytime near when you’ll be installing wallpaper, as paint typically takes weeks to fully cure and dry. However, since it was clear that my walls hadn’t been freshly painted in at least a few years, I wasn’t too concerned with protecting them. Besides, in the case that my walls did end up damaged, I figured it wouldn’t be too much of a hassle to pick up a can of white paint from Home Depot to cover it up.
When in doubt…just hire a TaskRabbit
Once my wallpaper arrived, the real fun began. Per the instructions, I wiped the walls down with alcohol and while I waited for that to dry, I began to unroll the panels and match up the patterns with each other. The installation guide came in handy as I lined up my first panel on the wall. However, I quickly found that I significantly lacked the patience required to get the wallpaper up in one sitting, and started to have nightmares of the single panel sadly lining my walls for the next few months after I abandoned the project. After struggling for a few hours and feeling like I was one wrong move from damaging the remaining panels, I made the call to hire a TaskRabbit to help me out instead.
When in doubt, hire someone to do the job right.
Courtesy Maliah West
Hiring the right TaskRabbit for the job is an art in itself, and as such, I have a few tips to share. First, select a handyman that specifically lists removable wallpaper under their possible tasks. Look for someone who has worked with wallpaper in the past to avoid any issues. Second, look closely at reviews, but also make sure to check out any attached pictures. Double-check that the prints are well-aligned and the wallpaper is smooth. And lastly, make sure to allot the proper amount of time for installation. For a small bathroom like mine, I estimated it would take about two to three hours.
Closing thoughts
All in all, I can’t recommend removable wallpaper enough for style-obsessed renters who want to add life to their all-white spaces. Especially since many brands have step-by-step guides to assist you in both getting it up and taking it down. While I think over time you can probably get the hang of doing the installation yourself, if I had to do it all over again, I would probably just pay a TaskRabbit from the start and save myself a few hours of frustration.
Even now, I’m still pleasantly surprised at how much the wallpaper transformed my bathroom. I’ve found new motivation to complete its glow-up with a new shower curtain, bath mat, and light fixture. My research offered mixed reviews on how the wallpaper will stand up to the humidity and extreme temperature changes brought on by daily showers, but so far I haven’t experienced any water damage.
After this first semi-venture into the DIY lifestyle, I’m probably not going to take on any of the crazy projects I currently have bookmarked (Exhibit A). But, I am walking away with the lesson that if I can’t do it, I can always pay a handier person who can.
Top photo courtesy of Otto Studio
We love the products we feature and hope you do, too. If you buy something through a link on the site, we may earn an affiliate commission.
Related Reading: